<>
Fix Windows Update
How to Fix Windows Update When It Gets Stuck
Windows Update is supposed to work silently in the background, but it may refuse to continue if it can’t install an individual update.
Fix Windows Update
- Try running the Windows Update Troubleshooter, which you can search for in the Start menu.
- If that doesn’t help, you can try deleting Windows Update’s cache by booting into Safe Mode, stopping the wuauserv service, and deleting the files in C:\Windows\SoftwareDistribution.
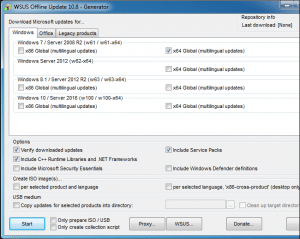
- If all else fails, download updates manually using the WSUS Offline Update tool.
This can happen on Windows 7, 8, or 10, but it’s become especially common with Windows 7. Sometimes updates will error out, or sometimes Windows Update may just get stuck “searching for updates” forever. Here are a few ways to give it a kick start.
Remember: Windows updates are important. No matter what troubles you’re having, we recommend keeping automatic updates turned on—it’s one of the best ways to keep yourself safe from ransomware and other threats. If you turn automatic updates off, you are leaving yourself vulnerable to new attacks.
Windows 7, 8, and 10: Run the Windows Update Troubleshooter
Windows includes a built-in troubleshooter that may be able to help fix a stuck update. It’s the easiest method to try, so go ahead and run it first. The troubleshooter performs three actions:
- It shuts down Windows Update Services.
- It renames the
C:\Windows\SoftwareDistributionfolder toC:\Windows\SoftwareDistribution.old, essentially clearing the Windows Update download cache so that it can start over. - It restarts the Windows Update Services.
This troubleshooter is available on Windows 7, 8, and 10. You’ll find it in the same place on all modern versions of Windows.
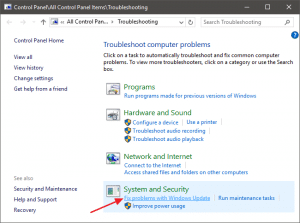
To run the troubleshooter, hit Start, search for “troubleshooting,” and then run the selection that search comes up with.
In the Control Panel list of troubleshooters, in the “System and Security” section, click “Fix problems with Windows Update.”
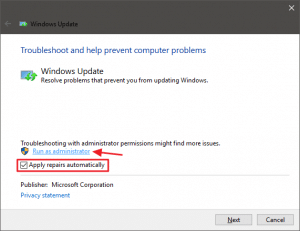
In the Windows Update troubleshooting window, click “Advanced.”
In the advanced settings, make sure that the “Apply repairs automatically” check box is enabled, click “Run as administrator” and then click Next. Giving the tool administrative privileges helps ensure that it can delete files in the download cache.
The troubleshooter works through its process and then lets you know whether it could identify and fix the problem. Most of the time, the troubleshooter can successfully remove a stuck update from the queue. Go ahead and try running Windows Update again. Even if the troubleshooter says it couldn’t identify the problem, it’s possible that the actions of starting and stopping the service and clearing out the cache did the trick.
Windows 7, 8, and 10: Fix Windows Update by Deleting Its Cache Manually
If you’re still having trouble after running the troubleshooter (or if you’re the type that just likes to do things yourself), performing the same actions manually may help where the troubleshooter didn’t. We’re also going to add the extra step of booting into Safe Mode first, just to make sure that Windows can really let go of that cache of Windows Update downloads.
Start off by booting Windows into Safe Mode. On Windows 7, restart your computer and press the “F8” key on your computer while it boots to access the boot options menu, where you’ll find a “Safe Mode” option. On Windows 8 and 10, hold down the Shift key as you click the “Restart” option in Windows and navigate to Troubleshoot > Advanced Options > Windows Startup Settings > Restart > Safe Mode.
It’s a little more cumbersome than it used to be on the latest versions of Windows, but it’s still reasonably straightforward. Of course, if you want, you could also take some time to add Safe Mode to the Windows boot menu to make it easier in the future. Fix Windows Update

When you’ve booted into Safe Mode, the next step is to stop the Windows Update service, and the easiest way to do that is with the Command Prompt. To launch the Command Prompt in Windows 7, open the Start menu, search for “Command Prompt”, and launch the Command Prompt shortcut. You’ll also find it under Start > All Programs > Accessories > Command Prompt. In Windows 8 or 10, you can right-click the Start menu (or press Windows+X), choose “Command Prompt (Admin)” and then click Yes to allow it to run with administrative privileges.
At the Command Prompt, type the following command and then hit Enter to stop the Windows Update service. Go ahead and leave the Command Prompt window open.
net stop wuauserv
Next, open a File Explorer window and navigate to C:\Windows\SoftwareDistribution . Delete all the files in the folder. Don’t worry. There’s nothing vital here. Windows Update will recreate what it needs the next time you run it.
Now, you’ll restart the Windows Update service. Return to the Command Prompt window, type the following, and hit Enter:
net start wuauserv
When the service has restarted, you can close Command Prompt and restart Windows into normal mode. Give Windows Update another try and see if your problem has been fixed.
Windows 7: Update the Windows Update Service
Microsoft has now provided official instructions about how to fix this problem. According to Microsoft, this problem occurs because Windows Update itself needs an update, creating a bit of a catch-22. If the latest updates to Windows Update are installed, the process should work better.
Here are Microsoft’s official instructions for fixing the problem.
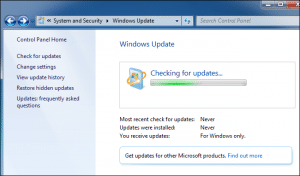
First, open Windows Update. Head to Control Panel > System and Security > Windows Update. Click the “Change Settings” link in the sidebar. Select “Never Check For Updates (Not Recommended)” in the dropdown box and then click “OK”. Fix Windows Update
Reboot your computer after you change this setting.
After the computer restarts, you’ll need to manually download and install two updates for Windows 7. You’ll need to check whether you’re running a 32-bit version of Windows or a 64-bit version and download the appropriate updates for your PC. Fix Windows Update
For 64-bit editions of Windows 7, download these updates:
- KB3020369, April 2015 servicing stack update for Windows 7 (64-bit version)
- KB3172605, July 2016 update rollup for Windows 7 SP1 (64-bit version)
For 32-bit editions of Windows 7:, download these updates:
- KB3020369, April 2015 servicing stack update for Windows 7 (32-bit version)
- KB3172605, July 2016 update rollup for Windows 7 SP1 (32-bit version)
Double-click the “KB3020369” update to install it first.
After the first update finishes installing, double-click the “KB3172605” update to install it second. You’ll be asked to restart the computer as part of the installation process. After it restarts, Microsoft says you should wait ten to twelve minutes to allow the process to finish. Fix Windows Update
When you’re done–remember to wait ten to twelve minutes after restarting–head back to the Windows Update dialog at Control Panel > System and Security > Windows Update. Click “Change Settings” and set it back to Automatic (or choose your desired setting).
Click “Check for Updates” to have Windows check for and install updates. According to Microsoft, this should have fixed your problems and Windows Update should now work normally without any long delays.
Windows 7: Get the Convenience Rollup
Wait for the updates download. If it’s a fresh install of Windows 7, there will be a lot of updates, so this may take quite a while. It depends on the speed of your Internet connection and how fast Microsoft’s download servers are for you.
Fix Windows Update
After the updates are done downloading, open the “client” folder in the WSUS Offline folder and run the UpdateInstaller.exe application.
Click “Start” to install the downloaded updates. After the tool finishes installing the updates, Windows Update should work normally again.
This should hopefully become a bit easier in the future. In October 2016, Microsoft announced that it was making changes to the way Windows 7 and 8.1 are “serviced”, or updated. Microsoft plans to release fewer small updates and more bundles of large updates. It will also begin combining previous updates into a monthly update rollup. This will mean fewer individual updates to install, and updating newly installed Windows 7 systems should become faster over time. Fix Windows Update
