Mobile travel photography: tips for smartphone snappers
The sophisticated cameras in our smartphones
are changing the nature of travel photography:
taking pictures has never been so quick or so
easy, and sharing them on the fly is now the
norm.
Yet the simplicity of snapping on a
mobile can come at the cost of quality;
lacklustre holiday shots slip across our
screens with increasing regularity. It
doesn’t have to be this way, though –
follow our tried-and-tested tips and
your mobile travel photography will
leave them scrolling for more, not to
mention garner a lot more ‘likes’.
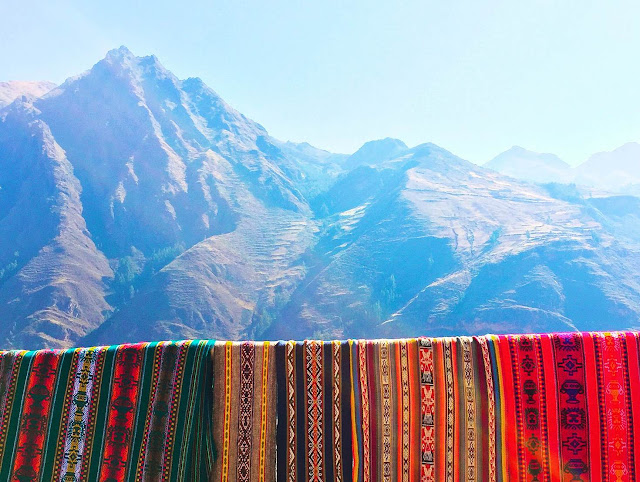
Handwoven tapestries hanging over the rail of a Sacred Valley mountain
overlook is a simple but striking way to frame Peru’s Andean Peaks
using the rule of thirds © MaSovaida Morgan / Lonely Planet
Cultivate good habits
Search for the shot
Arriving in a new destination can be a
sensory overload, but it’s also a great
opportunity to find subjects for
standout images. Pay attention to the
details as you’re going through the
typical motions of travel and you’ll
soon spot unique momenPlanet
th
shooting.
Snaps of must-see sights are fine, but
richer viewpoints abound. Develop a
‘photographic eye’ to see past the
predictable selfie-or-it-didn’t-happen
shots; look around for striking
juxtapositions, unique shapes, vibrant
colours, stunning silhouettes or
unexpected reflections in a body of
water. Get high, get low, get creative;
move your body to search for fresh
angles.

Vibrant colours, stark shadows and rich textures make portraits pop in
Peru’s Lamay district © MaSovaida Morgan / Lonely Planet
Capture a sense of place
Great travel images often document a
destination’s culture in a compelling
way – and smartphone cameras, which
are always to hand, ready to shoot in
seconds and above all inconspicuous,
make the job of catching a candid
moment of local life a lot easier.
Take time to observe the behaviour of
people around you; weigh up whether
there’s potential for a telling shot.
Never overstep the mark, though: if
they notice your presence, ask for
permission before continuing to hit
the shutter button. No means no in
any language or culture, so respect
requests for privacy and be prepared
to move along.
The architecture of Jesuit missionary-built churches on Chile’s quiet
Chiloé Island is striking in its own right, but something as simple as
a bird flying into the frame adds movement to an otherwise static
scene and helps establish a sense of place © MaSovaida Morgan / Lonely
Planet
Stay in the moment
Sometimes, the best photo opps appear
when we aren’t searching for them.
Maintaining a keen eye is important,
but don’t look so intently for a
potential image that you disengage
from the present altogether; it’s great
to have a series of photos to recall
your trip, but accept that some scenes
just can’t be captured in that way.
Know when to simply soak up what’s
happening around you. The perfect
moment might present itself when you
least expect it.

New York City’s Flatiron Building is one of Manhattan’s iconic and
often-photographed structures; capturing a different side of it in
‘golden hour’ light brings out its photo-worthy intricacies ©
MaSovaida Morgan / Lonely Planet
Time to get technical
Learn about light
Smartphone cameras restrict the
ability to adjust aperture, shutter
speed and other settings, as you might
do on a conventional camera. But
knowing how to ‘read’ the available
light is still a key skill.
First, observe the light with your eyes
alone, then look again through the
smartphone’s display; pay attention to
how it can affect shadows, direct
attention and, in particular, shift
colours (in addition, the colours we
see with the naked eye rarely appear
the same on a display).
Light determines the quality, mood
and richness of colour. At noon, you’ll
experience stark but neutral light with
sharper shadows as the sun reaches its
zenith; the hours after sunrise and
before sunset, known as the ‘golden
hour’, make colours warm, rich and
soft, transforming even the most
mundane scene into something
ethereal.

Shooting indoors can be tricky due to
a lack of light, the shifty
incandescence of filament bulbs, or
even worse, the blue-green cast of
fluorescents. But even the colour shifts
of artificial light have the potential to
create atmosphere and convey a
specific mood, so take that into
consideration and make it work in
your favour – the results just may
surprise you.
When capturing indoor activities, such as a cooking lesson in Chile’s
Lake District, opt for HDR over flash for a softer exposure to bring
out close-up details © MaSovaida Morgan / Lonely Planet
Flash v HDR in low-light conditions
In-camera flash on smartphones has
the potential to wash out a subject,
hamper focus (which should be tack-
sharp, unless you’re aiming for a soft-
focus effect), and cause the dreaded
red eye. Try utilising the HDR function
over flash – it captures a series of
shots at different exposures and layers
them into one photo with a more
balanced light and detail.
If you must use artificial light in a
dark setting, get help from a friend.
Ask them to point their smartphone
flashlight (or a proper flashlight, if
available) at the subject. For an even
cleaner, softer look, unfold a white
paper napkin – separate it into a single
ply if needed – and ask your new
assistant to shine the flashlight
through the material to create an
impromptu photography studio.
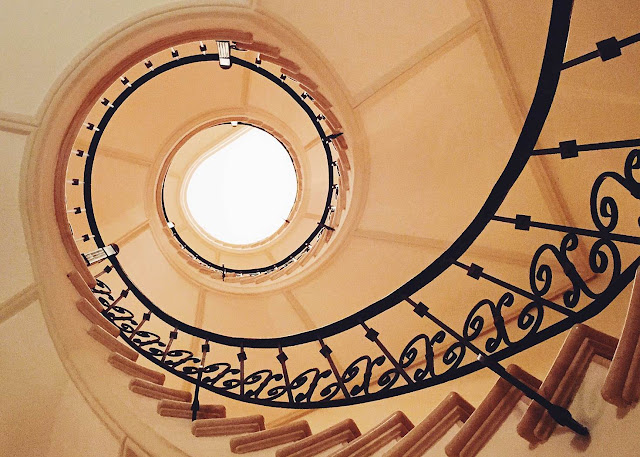
The grand architectural details of Quito’s historic Casa Gangotena
hotel are a visual feast. A look up the spiral staircase from the
ground floor shows a skylight in the left third of the frame – the
eyes are led to this focal point by the organic path of the banister ©
MaSovaida Morgan / Lonely Planet
Using the display as a viewfinder
Seeing the potential in a scene or
subject is just the start – translating
that potential into a compelling
composition within the bounds of your
smartphone’s display (the equivalent
of a conventional camera’s
viewfinder) is what creates interest,
guides the eye and conveys the
message.
The ‘rule of thirds’ is the first thing
photographers learn when it comes to
composition: imagine lines dividing
the frame into three equal parts –
vertically and horizontally – to create
a grid of nine segments. Now place the
focal point of the image in a position
where the lines intersect, away from
the centre of the frame, for a more
balanced composition.
When capturing food close-ups, sometimes less is more; cropping and
colour create visual harmony over a bowl of soup in Ecuador’s Cotopaxi
National Park © MaSovaida Morgan / Lonely Planet
It’s hip to be square
Once you know the rule, it’s fine to
break it. Instagram has re-popularised
square dimensions reminiscent of old
Polaroid and 120 mm medium format
camera film – in this aspect ratio,
placing a subject in the centre can
produce a pleasing effect. The rule of
thirds is still useful vertically when
capturing a horizon line, defining the
fore-, middle- and background, or
establishing an image’s depth of field.
In-camera, manipulating depth of field
– the distance between the nearest and
farthest points in a composition that
are in sharp focus – is still limited on
most smartphone cameras. But it’s just
a matter of time before that changes…
until then, there are filters for that.
The distinctive structures of Brazilian architect Oscar Niemeyer, such
as São Paulo’s Auditório Ibirapuera, are famed for their modern
aesthetic. Simplicity and symmetry – plus the silhouette of a friend –
guide the eye in this shot © MaSovaida Morgan / Lonely Planet
Sharing your shots on social media
Where to share?
So, you’ve captured the shot and
tweaked it in camera or using your
favourite editing app. What’s the best
strategy for sharing it? Consider which
platform(s) you’d like to post to, and
whether it’s better to post a single
snap or a curated set of images that,
together, convey a feeling, tell a story
or present a theme meaningful to you
and the audience.
Different tactics apply to different
platforms, but as a general rule, don’t
overshare; no matter how great your
images may be, they’ll be ignored if
you bombard your followers. Timing,
sequencing and linking are the keys to
driving good engagement.
More than 55 varieties of corn grow in Peru – the colours, shapes and
textures found in these few showcase the country’s agricultural
diversity © MaSovaida Morgan / Lonely Planet
The nuances of cross-posting
On Instagram, limit your posts to three
or four a day and spread them out
over several hours if possible; blasting
off one photo after another can turn
people off, as they’ll see nothing but
your posts as they swipe down their
screens.
Linking Instagram to other social
media accounts makes it simple to
share across platforms, but give
thought to how each image will appear
in another app’s interface. Twitter’s
character limit could cut off a caption,
for example, and the image itself
won’t come through in the tweet. If
you want the photo to show up, it’s
better to compose the tweet directly in
the app. Doing it this way also enables
you to add more images to run
together, so the presentation in your
followers’ feeds will look much more
cohesive.
A direct share to Facebook will surface
the image as it originally appeared on
Instagram and won’t clip the caption,
but this has the potential to
overwhelm your followers’ feeds in
much the same way as Instagram. It’s
suitable for one-offs, but if you intend
to share a collection of shots on
Facebook, consider a single post of
multiple photos, or creating a specific
album you can add to later.
As a rule, be choosy about what
appears where: if you’ve got the same
followers on different platforms,
posting the same image everywhere
might feel redundant. If you must
reuse content, space it out over a
couple of days, or better yet, select an
image that’s similar but different
enough to offer a fresh perspective.
Get on a different level (or storey) to capture a different
perspective of major must-sees; this 2-for-1 features New York City’s
Washington Square Arch in the foreground and the Empire State Building
further afield © MaSovaida Morgan / Lonely Planet
Source
Discover more from Applygist Tech News
Subscribe to get the latest posts sent to your email.


