How to back up your music files to your computer or online storage
If you have all your beloved music on your Android phone, then it’s probably a good idea to back it up, especially if you plan on buying a new phone. You can choose to back up your music to a computer or you can back it up to the cloud so that you can access it from virtually any device (pun intended).
We have a few apps that we like to use to make backing up music easier. Here’s how to backup your music (just in case).
How to back up your music files to online storage
Backing up your music to the cloud is the first logical step if you want to make sure that if your phone craps out, your music doesn’t go down the toilet with it. There are two awesome apps you can use that your music files can follow you wherever you go.
Google Drive
Google Drive is where it’s at when it comes to file storage. You get 15GB of free storage space! Depending on file sizes, 15GB is nearly 4,000 songs. Just like Dropbox, Google Drive is ubiquitous; if you have a device with an internet connection, you can access your Google Drive, thanks to the cloud. If you have a Gmail account, then you have Google Drive.
You can listen to the music you upload right in Google Drive or you can download it for offline listening and you bet your sweet patoot that you can share anything and everything via a link to that file or folder, even with non-Google users (the heathens!).
If your Android phone didn’t come with Google Drive, it’s a free download on the Google Play Store.
To set it up, you just sign in with your Gmail address and password. From there, you just tap the big ol’ + button to upload files or folders. To upload music, just choose Audio from the list of options. You can upload as many songs as you’d like (or your 15GB limit will allow). If your Google Drive starts to fill up, just download files to your computer and transfer them to an external hard drive, if that’s your fancy.
To access Google Drive on your computer, just hit up drive.google.com and sign in. You’ll walked through a simple setup process and then you’ll be ready to go. Google Drive is seamless, so you can enjoy your favorite music on just about any device.
Dropbox
A basic Dropbox account is free and comes with 2GB of storage. All you need to sign up is an email address and a pocket full of dreams (pocket full of dreams is optional). Visit Dropbox.com, enter your name, email and a password and you’re on your way.
2GB isn’t exactly a ton of storage, so you may want to download music to your computer as you transfer more into your Dropbox folder.
Here’s how to intstall Dropbox on your computer:
- Launch your web browser on your computer.
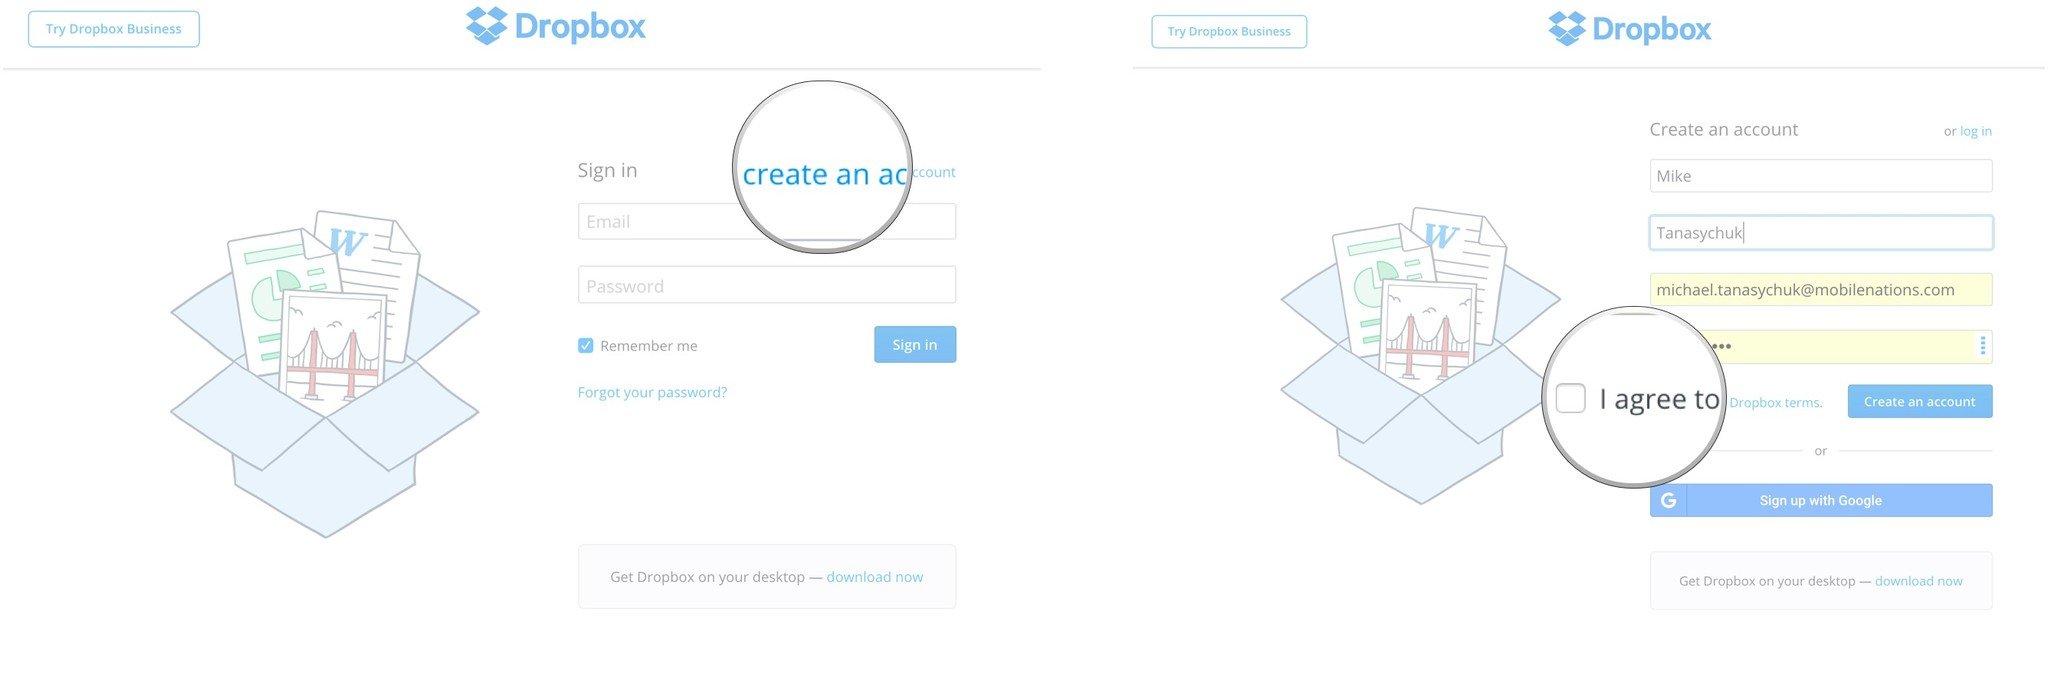
- Navigate to Dropbox.com.
- Click create an account.
- Enter your first name, last name, and email address into the fields. You can also choose to Sign up with Google.
-
Click the checkbox to agree to the terms and conditions.

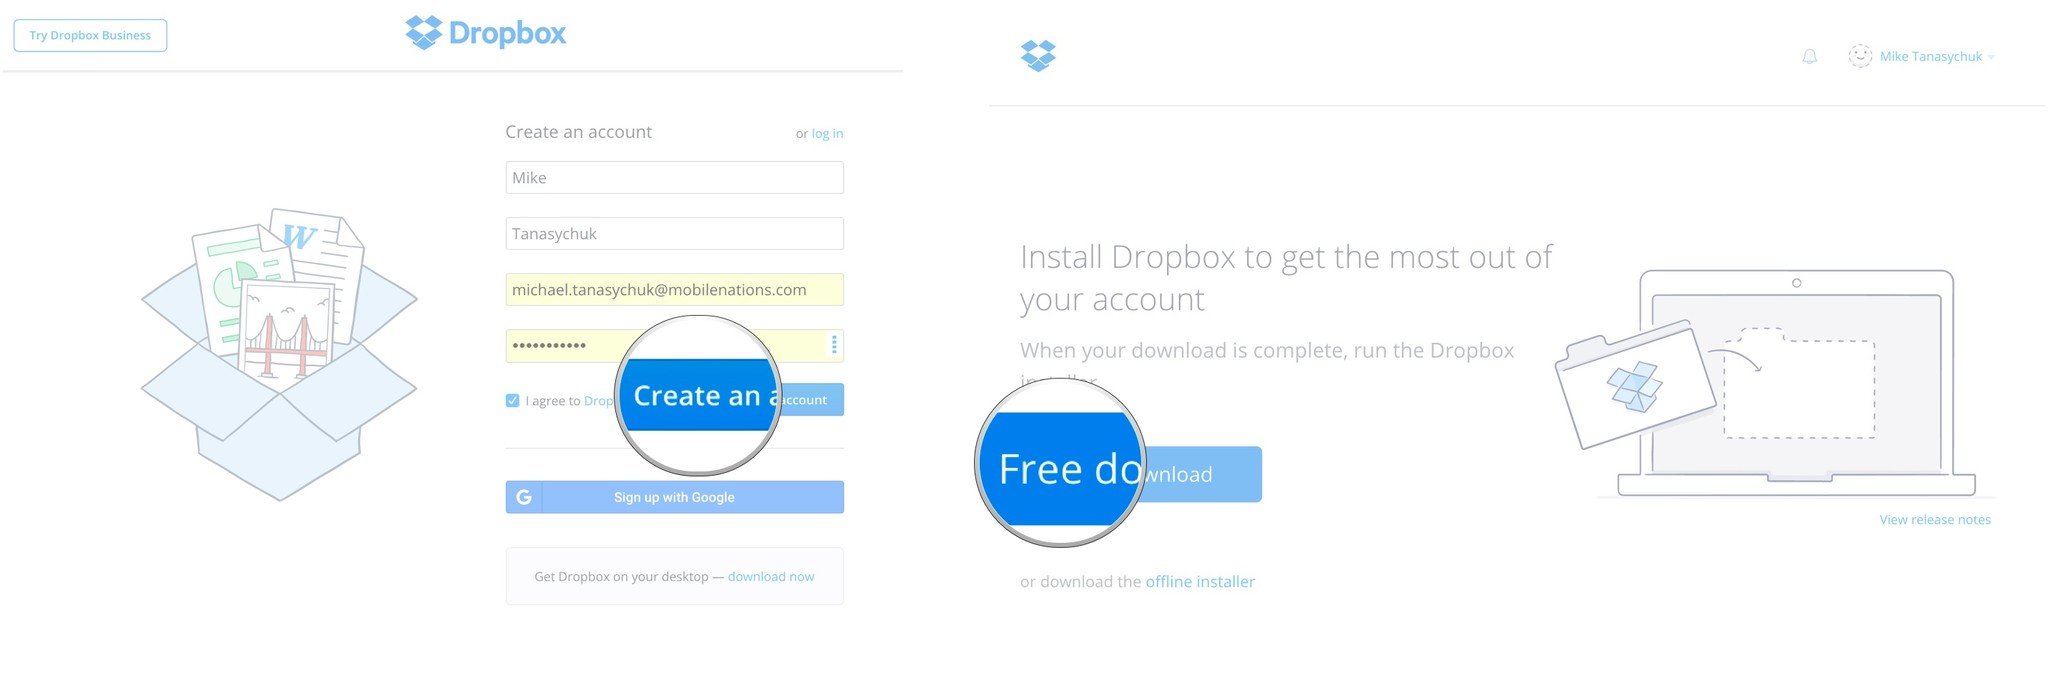
- Click Create an account.
-
Click the Free Download button to install Dropbox on your computer.
Next, you’ll want to install and set up Dropbox on your Android phone if it isn’t already. Here’s how:
- Download the Dropbox app from the Google Play Store.
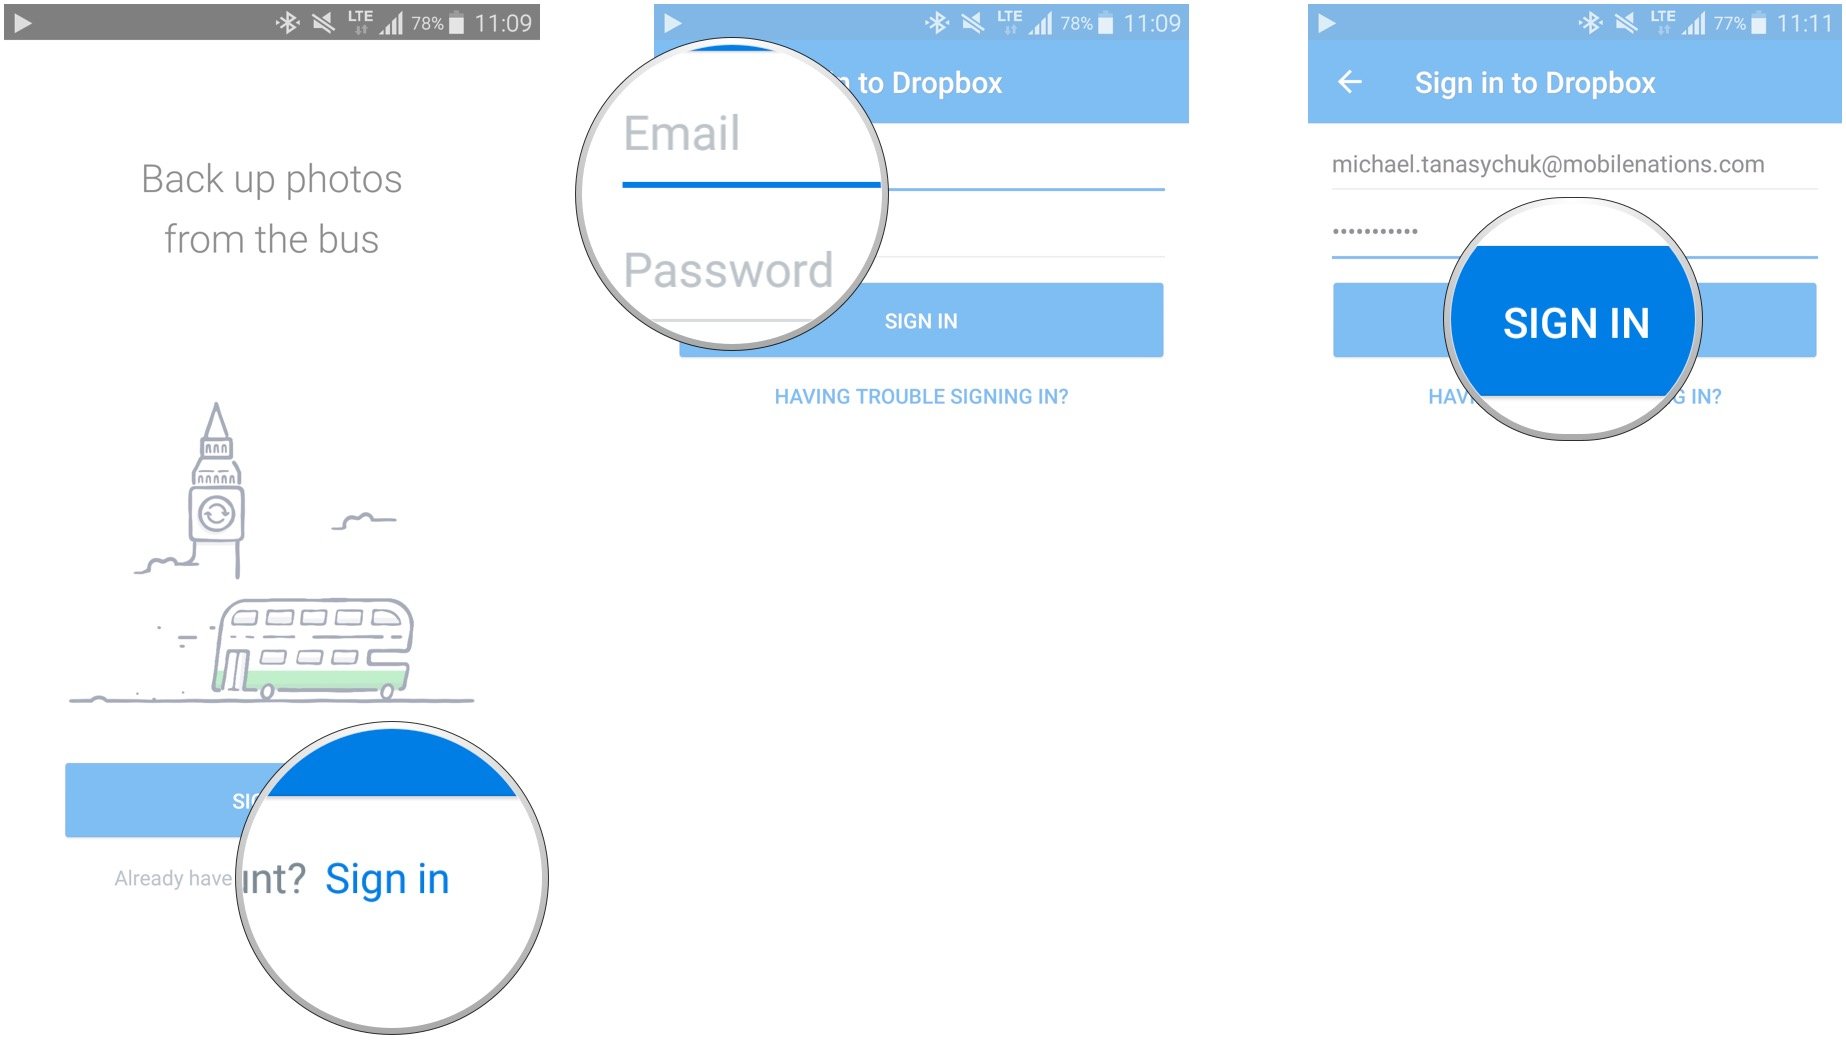
- Launch Dropbox from your home screen or the app drawer.
- Tap Sign in.
- Enter your email address and password.
-
Tap Sign in.

You can tap Not Now through the “Set up Dropbox on your computer” stuff, since you’ve already done that.
Now when you want to upload files, create folders, take photos to upload, and a lot more, you just press the big + button. To add your music to your Dropbox folder, just select Audio from the list of options that pops up.
Once your music is in the cloud, you’ll be able to access it from any device that has Dropbox on it and, even better, you’ll be able to share it all with friends, even those without Dropbox! They’ll simply receive a link and will have full access to the music you’ve shared.
Dropbox isn’t just for music; you can upload video, photos, text files, and just about everything in between. It certainly beats the hell out of having to connect a USB cable from your computer to your phone and you can easily make files available offline by downloading them from your Dropbox folder.
How to back up your music files to your computer
You can use a USB cable and transfer your music from your phone to the hard drive on your computer. This works like any other MTP device (like a media player or camera) and the only limiting factor is hard drive space. it’s also pretty easy to do.
Android File Transfer
If you’re a Mac user you need a special utility to transfer music (or any type of file) from your Android phone onto your computer: Android File Transfer. It’s not the greatest app in the world, but it gets the job done.
There isn’t much to the setup process; you just download it, install it, and that’s it. When you connect your Android phone to your Mac via USB, Android File Transfer will open automatically. You may have to tap Allow on your phone before you’re able to access its contents on your Mac.
Once you do have access, you’ll be able to access all of the files that are stored on your Android phone, as well as any that are stored on your microSD card, if you use one. From there, you can just drag and drop music at will into folders on your computer. The best part is that you can drag out entire folders into a Finder window, instead of having to tap, hold, and select all, like you do on your phone.
One caveat: do not try to move too much music at once. One of the reasons Android File Transfer isn’t so great is that it seems to just crap out if you overload it. When transferring music, do so in smaller batches under 1GB. Otherwise, you might get halfway through transferring a batch and it’ll just stop and you’ll have to dig around and figure out exactly where it stopped and where to start again.
It may be a bit of a pain in the hiney, but if you want music from your Android phone on your Mac without using a cloud-based service, then it’s the only way.
Windows users have it even easier
When it’s finished you can “eject” the phone from the taskbar icon like any other USB device.
The first time you plug your phone in Windows might need to install and setup some things. Just wait until it’s finished and you’ll be ready to go.
The bottom line
Using a cloud-based service to transfer music from your Android phone to your computer is easy, and you can access your music from just about any device with an internet connection. You can also download your tunes for offline listening to a computer or another Android from the cloud service.
The sharing feature is also a great reason to use Google Drive or Dropbox since most songs are too large to email normally and the folks you share with can choose to download the music you send or play it right there in the Google Drive or Dropbox link.
If you would rather skip the cloud, using a USB cable to transfer files directly to a computer is easy, too. Android File Transfer can get finicky from time to time if you’re a Mac user, but in the end everything is just drag and drop.
